
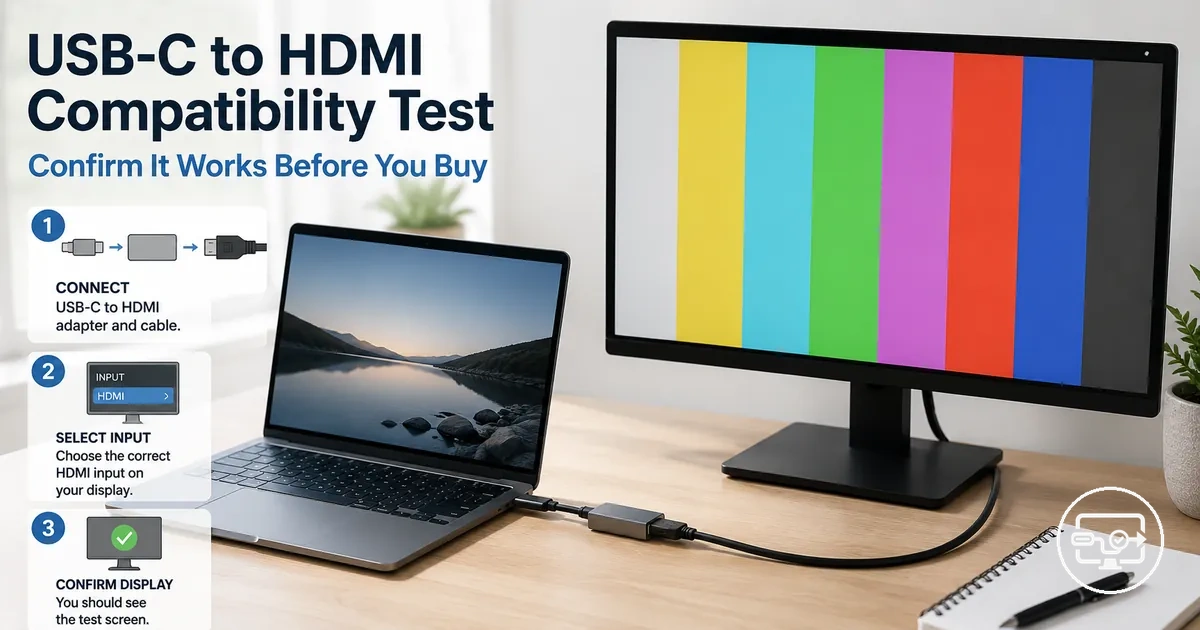
USB-C to HDMI Compatibility Test Before You Buy
A USB-C to HDMI compatibility test confirms whether a device's USB-C port supports video output. This test helps you avoid buying an adapter or cable that produces a blank screen. It does not cover performance tuning, content playback edge cases, or product-led recommendations.
Running two checks before purchase reduces uncertainty. Checking the device's specifications or settings shows whether the port supports video output, and a controlled physical test with a known-good display chain can help confirm whether the signal works.
The test addresses the common misconception that any USB-C cable or adapter can carry video, because USB-C ports vary in what they support. Some USB-C ports only handle data transfer, not video.
- Capability check: checking whether the port supports DisplayPort Alternate Mode.
- Signal test: connecting the adapter and monitor to verify the display shows an image.
The result of a compatibility test is conditional: it depends on the device model, port implementation, operating system behavior, and adapter power requirements. Interpreting the outcome safely means accepting that 'works' applies only to that specific combination.
What a “compatibility test” can prove before purchase
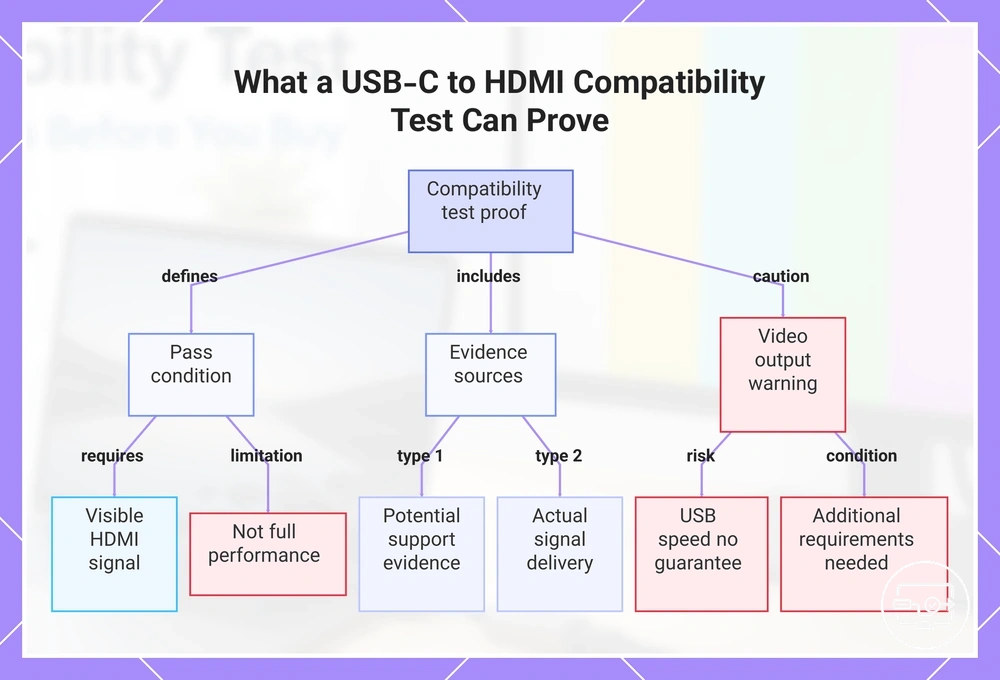
The pass condition for a USB-C to HDMI compatibility test is that the device produces a visible HDMI signal on an external display under typical connection conditions, but this does not confirm full performance.
Capability evidence comes from specs, labels, and settings indicating potential support. Observed output relies on detection and actual signal delivery. Start with capability evidence; observed output often gives a more conclusive result.
However, a high USB data speed or version number does not guarantee video output support. For a reliable connection, an additional set of requirements must align; the USB-C to HDMI Compatibility hub provides further details.
This chart shows the pass condition, evidence types, and key warnings for a USB-C to HDMI compatibility test.
What you need to run a meaningful USB-C to HDMI test
A meaningful USB-C to HDMI test requires a USB-C source that supports video output, an HDMI display, and a single controlled connection path between them. Controlling these variables helps prevent false negatives, so you can tell whether an incompatibility comes from the device, the cable, the adapter, or the display itself.
This diagram labels each link you will verify in your setup.
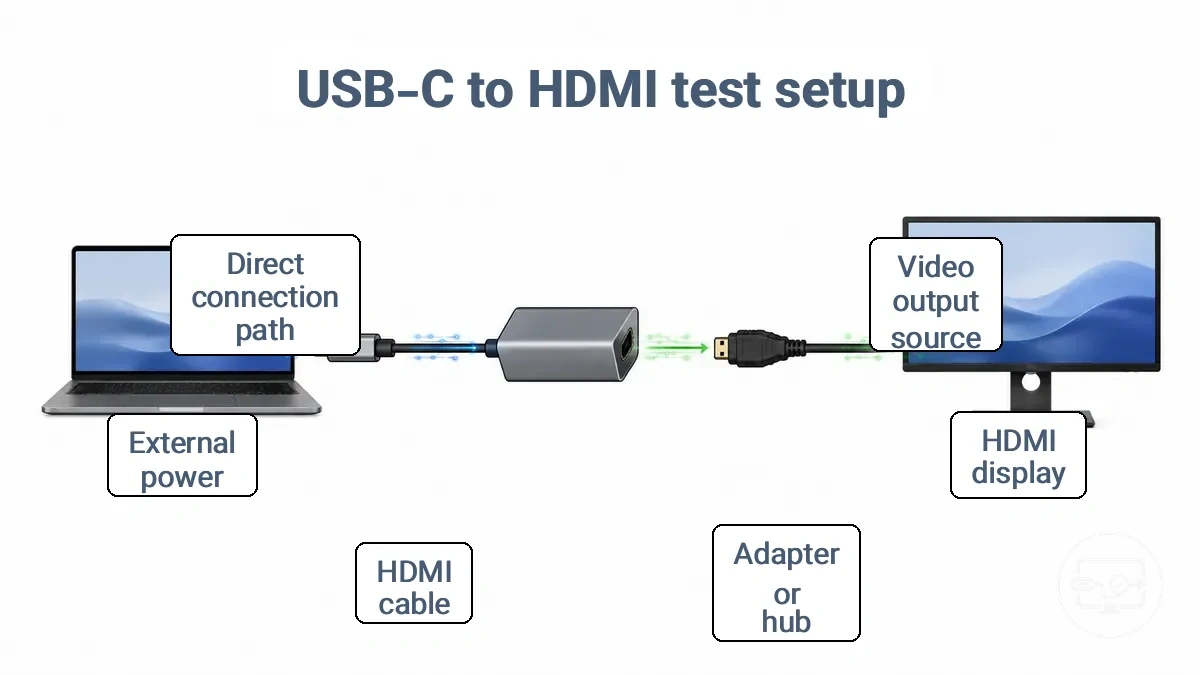
A complete signal chain for the test includes:
- USB-C source device and port – verify that the port supports video output (Alt Mode) and that the device is capable of sending a display signal.
- HDMI display – verify the correct input selection is active and the display can accept the expected resolution and refresh rate.
- Adapter, hub, or cable – verify it is designed to convert USB-C video signals to HDMI; not every USB-C accessory supports display conversion.
- HDMI cable – verify it is intact and can carry the signal with reliable signal quality; a known-good cable helps isolate issues.
- External power (when required) – some adapters or hubs need stable power to maintain signal output; if your setup uses a powered hub, confirm power is connected and steady.
- Connection path – verify the path is as direct as possible, with no unnecessary adapters or converters that could cause signal loss.
If your setup includes a hub or adapter that draws power, using the included power supply or a stable USB‑C power source can prevent intermittent output. Once the signal chain is verified, you can confirm whether your device can output video to the display.
Confirming your USB-C port supports video output before you test
USB-C video output to an external display requires the port to support video, not just the connector shape. A USB-C port that only handles data or charging cannot send a display signal to an HDMI adapter or monitor.
Check the device specs, port icons or labels, and system settings to find out if your USB-C port supports video output.
A DisplayPort (DP) icon or a Thunderbolt lightning bolt next to the port is a strong signal. The manufacturer documentation for your exact model is often the most reliable source. You can be more confident if the spec sheet mentions DisplayPort Alt Mode, Thunderbolt, or USB4 with display support. If the documentation is unclear, a controlled physical test with a known video-rated cable and a display can confirm the capability.
USB data speed does not indicate video output support. A port labeled USB 3.2 Gen 2 can transfer files quickly but may still lack the hardware needed for display signals.
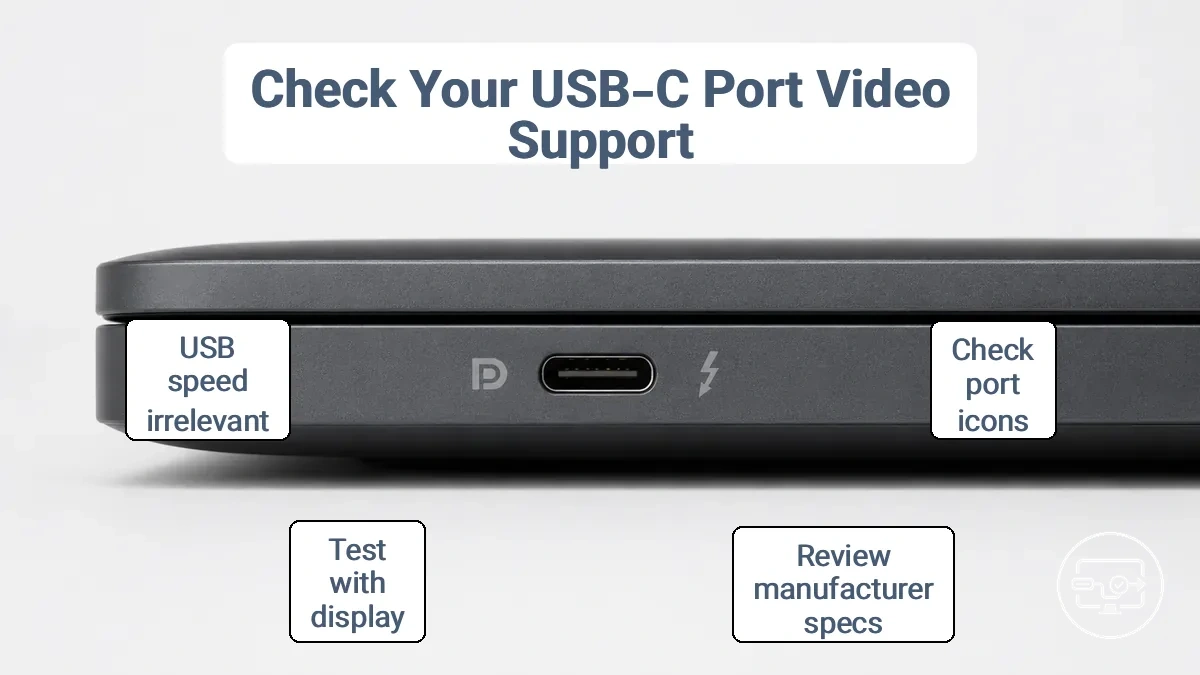
To confirm your USB-C port supports video output, verify these signals:
- Check the port for a DisplayPort (DP) icon or a Thunderbolt lightning bolt symbol.
- Look up the exact model specs on the manufacturer support site for phrases like DisplayPort Alt Mode or Thunderbolt.
- Review system display settings or BIOS for USB-C display routing options.
- Test with a known video-rated USB-C cable and a display that accepts USB-C input.
- If the port lacks symbols and the documentation is vague, treat video support as unconfirmed until a physical test passes.
The compatibility checklist for your port provides a more detailed breakdown of what to check on your device.
USB data versions vs USB-C video output support
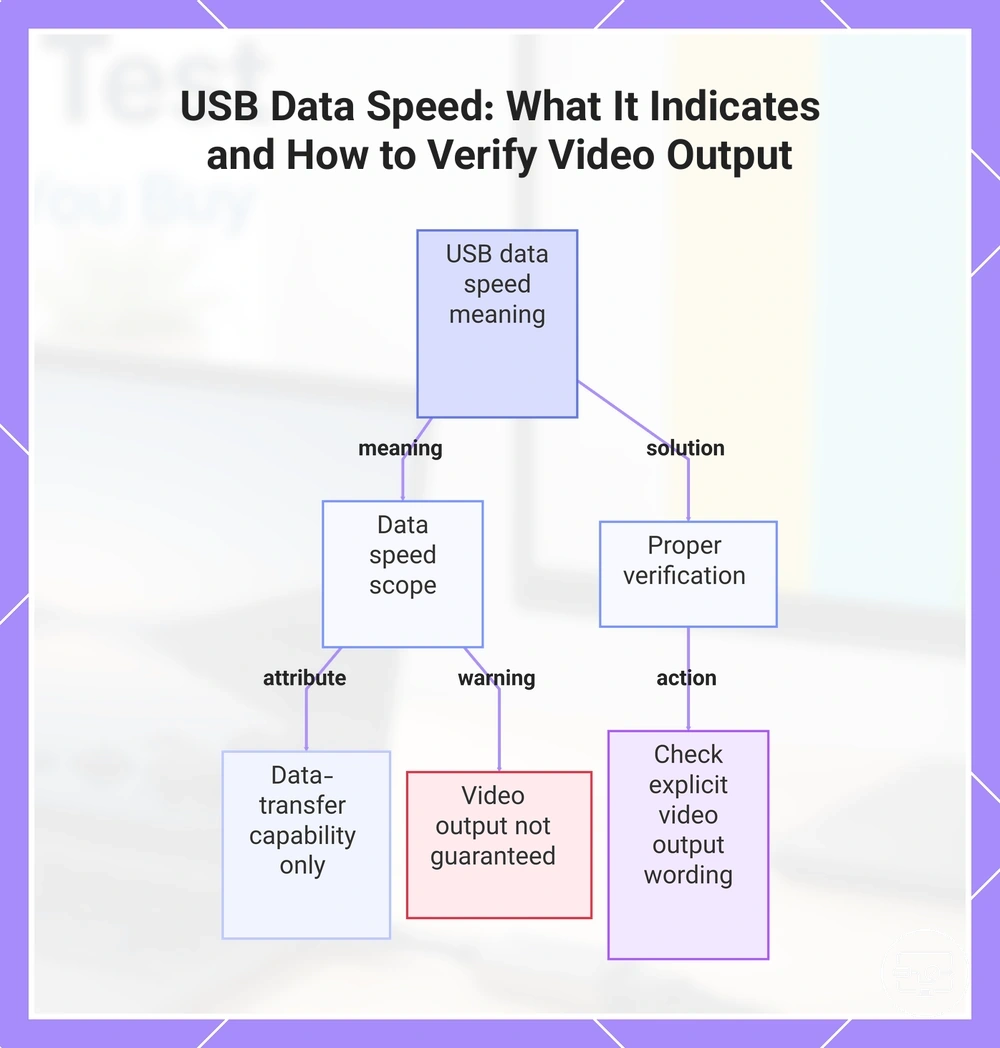
USB data version/speed labels indicate data-transfer capability only, not video output support—a port with high data speeds may still lack the indicators needed for an external display. Check the specifications for explicit video output support wording rather than relying on data-speed labels.
This chart shows what USB data speed labels mean, why they do not guarantee video output support, and how to correctly verify video output capabilities.
Finding video-output signals in specs, port labels, and device documentation
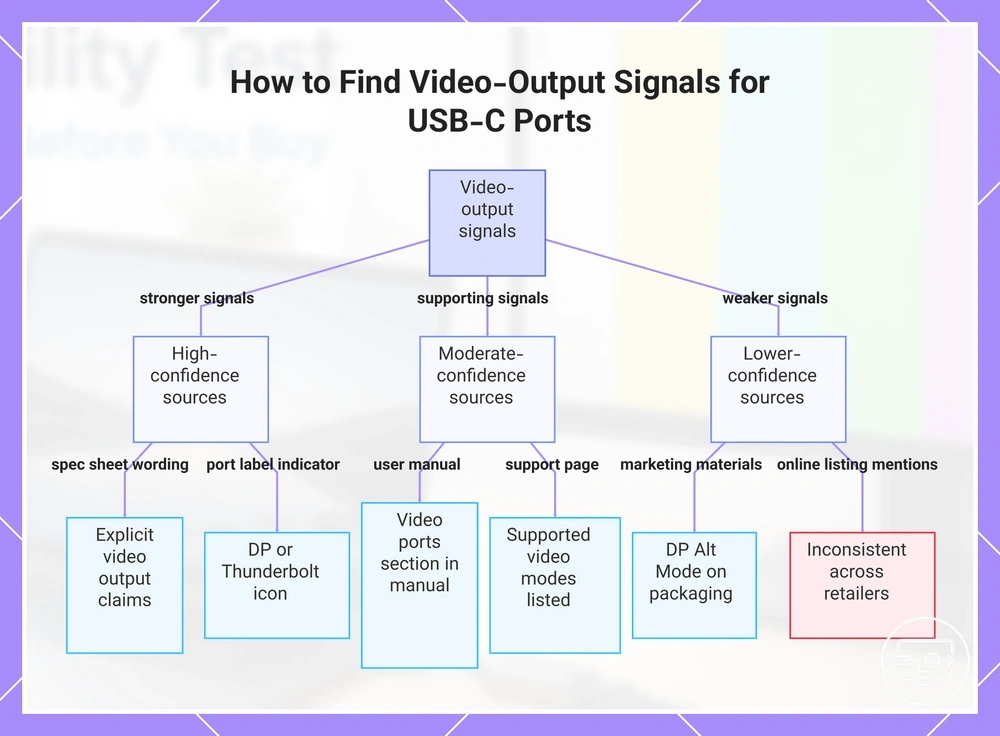
Finding video-output signals means looking for explicit statements that the USB-C port supports external display or video output. Cross-checking several sources reduces false positives, so prefer explicit wording like 'supports video output' over vague USB data references. Evidence sources can be organized by confidence level, from stronger to weaker signals.
- Spec sheet: Look for phrases such as 'supports external display' or 'video output' in the product's technical specifications.
- Port label/icon: A DisplayPort (DP) or Thunderbolt icon next to a USB-C port indicates video output capability, though icon design may vary by manufacturer.
- User manual: The device manual often includes a section on video ports or display outputs that states whether the USB-C port supports external monitors.
- Official support page: Manufacturer support documents may list supported video modes and required cable types for video output.
- Packaging or marketing materials: Terms like 'DP Alt Mode' or 'USB-C to HDMI' on the box suggest video output support, but these are less definitive than technical specs.
- Online product listings: Descriptions that mention 'Alt Mode' or 'supports HDMI/DisplayPort' are useful, but may be inconsistent across retailers.
This chart organizes evidence sources by confidence level to help you determine if a USB-C port supports external display or video output.
Checking OS display settings to verify external display capability
Display settings can confirm detection and available output selection when an external display is connected.
- Check that the external display appears as a detected device.
- Select mirror or extend as the display mode.
- Identify the external display in the list when multiple displays are connected.
- Verify the resolution and refresh rate options for the external display.
- If the external display does not appear, options may be missing; this does not necessarily confirm hardware incompatibility.
Low-cost or no-purchase ways to validate compatibility
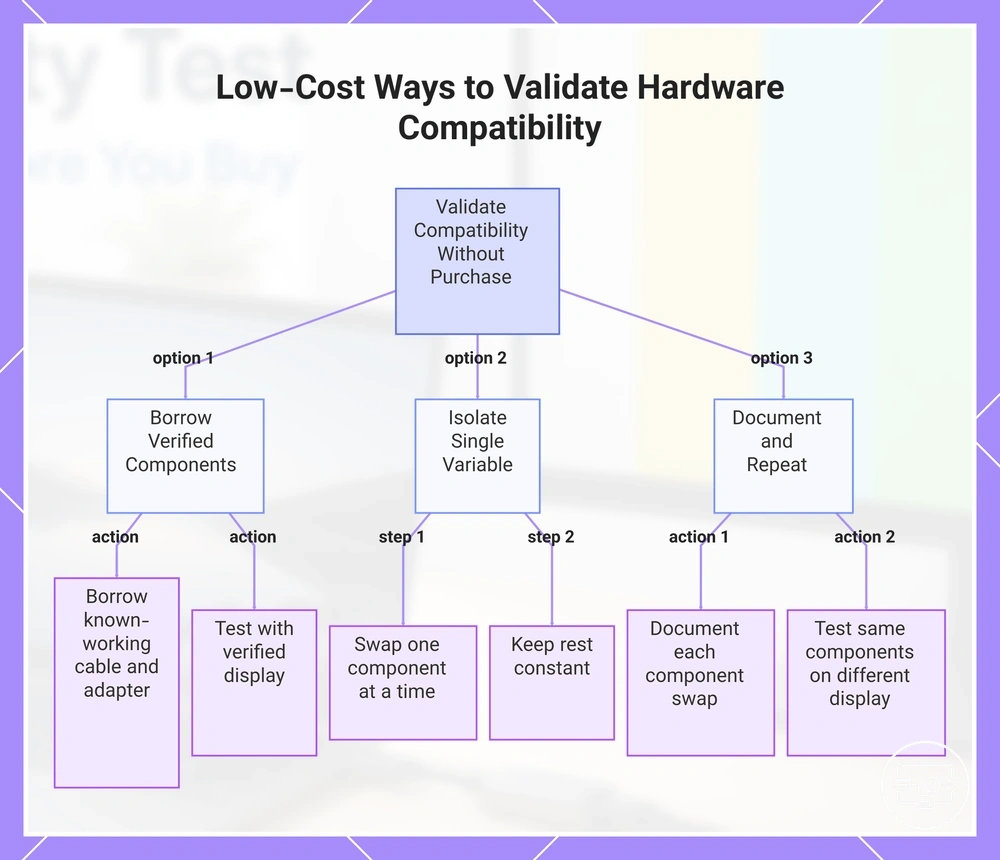
Borrowing a verified cable and adapter from a friend or colleague reduces the risk of buying incompatible hardware. Testing with a known-working display setup can confirm whether the connection path is sound before you spend money. This control test gives you confidence in the chain without requiring a purchase.
When results are unclear, isolate one variable at a time. Swap one component—cable, adapter, or source—while keeping the rest constant. This approach can reveal whether the issue lies with the display input, power requirement, or adapter type. Each swap makes the outcome interpretable.
Low-cost validation works best when you keep the chain constant and test one change at a time:
- Borrow a cable and adapter that you know work together.
- Test against a display that has accepted the same signal before.
- Use the same source device for each test.
- Document each swap so you can trace what changed.
- If failure persists, test the same components with a different display.
This chart shows practical no-purchase methods to test cable, adapter, and display compatibility using borrowing, variable isolation, and documentation.
Borrowing a known-working adapter, hub, or cable as a control test
A borrowed known-working adapter, hub, or cable can serve as a control test once you confirm it outputs video on another device. This establishes a useful baseline before buying.
If the control works elsewhere but fails on your target device, the issue likely lies in the target device's configuration or port. If the control also fails on the control device, the borrowed component may not be fully functional.
- Verify the borrowed component works on a separate, known-good device before testing your target.
- Swap only one component at a time in the connection chain to isolate the variable.
- Repeat the same connection steps on the target device and interpret the result based on the control behavior.
Using device-side capability checks when hardware access is limited
A device-side capability check uses official specs, product documentation, or operating system indicators to determine if a device's USB-C port supports external display.
This check provides confidence but requires a physical test to confirm support.
Ambiguous wording that mentions only data transfer without referencing external display indicates an evidence gap. The next step is to test with a known-good display and cable chain.
- Official manufacturer specifications listing DP Alt Mode or external display support.
- Product documentation or support pages describing video output.
- Operating system indicators (e.g., display settings, device manager) that suggest external display support.
Step-by-step USB-C to HDMI test flows with a monitor or TV
The display receives a stable HDMI signal from the USB-C source through the chosen connection path. A controlled sequence of checks verifies each link before concluding compatibility.
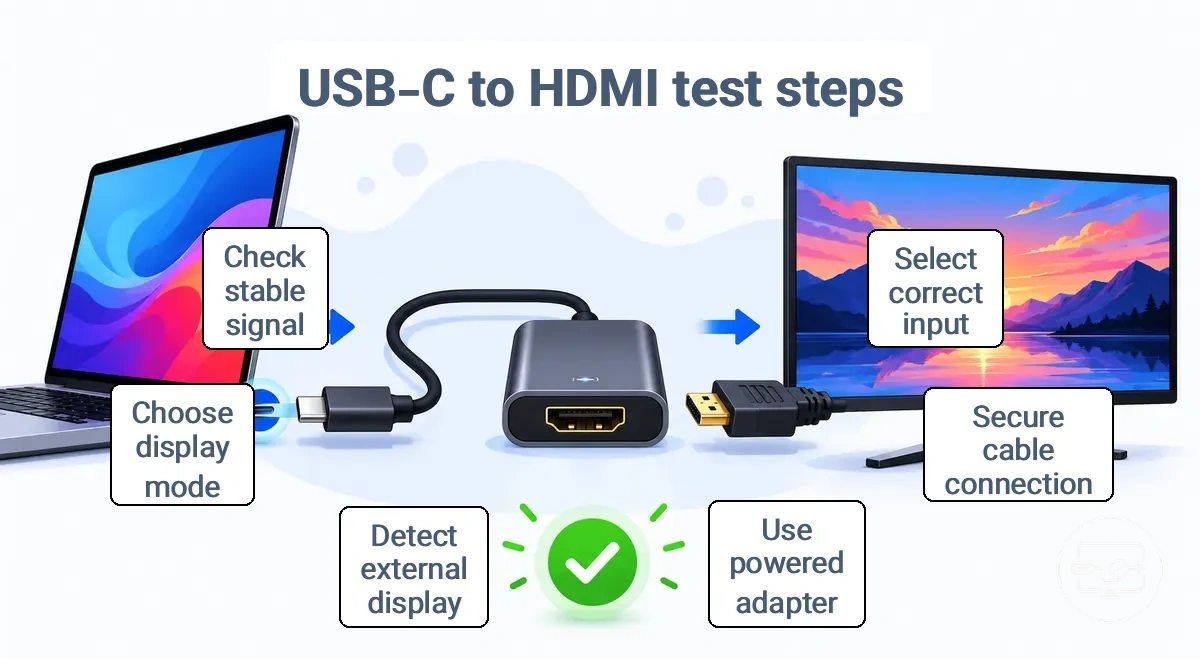
- Select the correct HDMI input on the monitor or TV. A successful selection usually wakes the display from standby or shows a brief input notification.
- Connect the USB-C end of the cable or adapter firmly to the source device and the HDMI cable to the adapter or directly to the display. A secure connection reduces the risk of intermittent signal loss.
- If the adapter or hub requires external power, connect its power supply before testing. Using a powered adapter or hub lowers the chance of a weak signal.
- On the source device, open the display settings and click “Detect Displays” (Windows) or “Detect Displays” (macOS). When the external display appears in the settings, the detection is successful.
- Choose the display mode: extend or mirror. The monitor or TV then shows the extended desktop or a mirrored copy of the source screen.
- Check that the external display remains active after mode selection. A stable signal without flicker confirms the connection path works.
If the display is detected and shows the desktop or mirrored screen, the connection path is likely valid. A “no signal” message during the test means you should recheck each connection and input selection before assuming a deeper issue. For setup steps after compatibility is confirmed, proceed once the basic signal is stable.
Laptop Test Flow for Confirming USB-C to HDMI Output
A USB-C to HDMI connection passes when the laptop detects the external display and outputs video through the adapter or hub.
- Connect the USB-C end of the adapter or hub firmly into the laptop’s USB-C port.
- Connect an HDMI cable from the adapter to the HDMI input on the external monitor or TV.
- On the external display, select the corresponding HDMI input source using its remote or menu, and confirm the input is selected.
- Observe the laptop for a detection signal; it may appear as a new display notification or in display settings.
- Choose a display mode: extend to use the external monitor as additional workspace, or mirror to duplicate the laptop screen. Observe the resulting display arrangement.
- Confirm that a stable image appears on the external display without flicker or signal dropouts.
In some setups, plugging the laptop into power or using a powered hub can affect detection; an adequate power supply may improve reliability.
Phone and tablet test flow for confirming USB-C to TV output
Pass condition: The TV shows the phone/tablet output through the selected HDMI input.
- Set the TV to the correct HDMI input and confirm it can receive a signal.
- Connect the USB-C end of the adapter or hub to the phone/tablet port. Ensure the connection is secure so the signal can be detected.
- If the adapter or hub has an external power input, connect it to power. This helps keep the connection stable and prevents signal loss.
- Attach an HDMI cable from the adapter or hub to the TV HDMI port. Make sure the cable is fully inserted for proper signal transmission.
- On supported devices, a prompt for external display mode or screen mirroring may appear. Choose the appropriate option.
- Wait for the TV to detect the signal and show the device screen.
- If no prompt appears, check the TV input and hub power connection.
Support varies by model and software policy, so a negative result may reflect device limitations rather than a hardware fault.
Interpreting outcomes and choosing the next best path
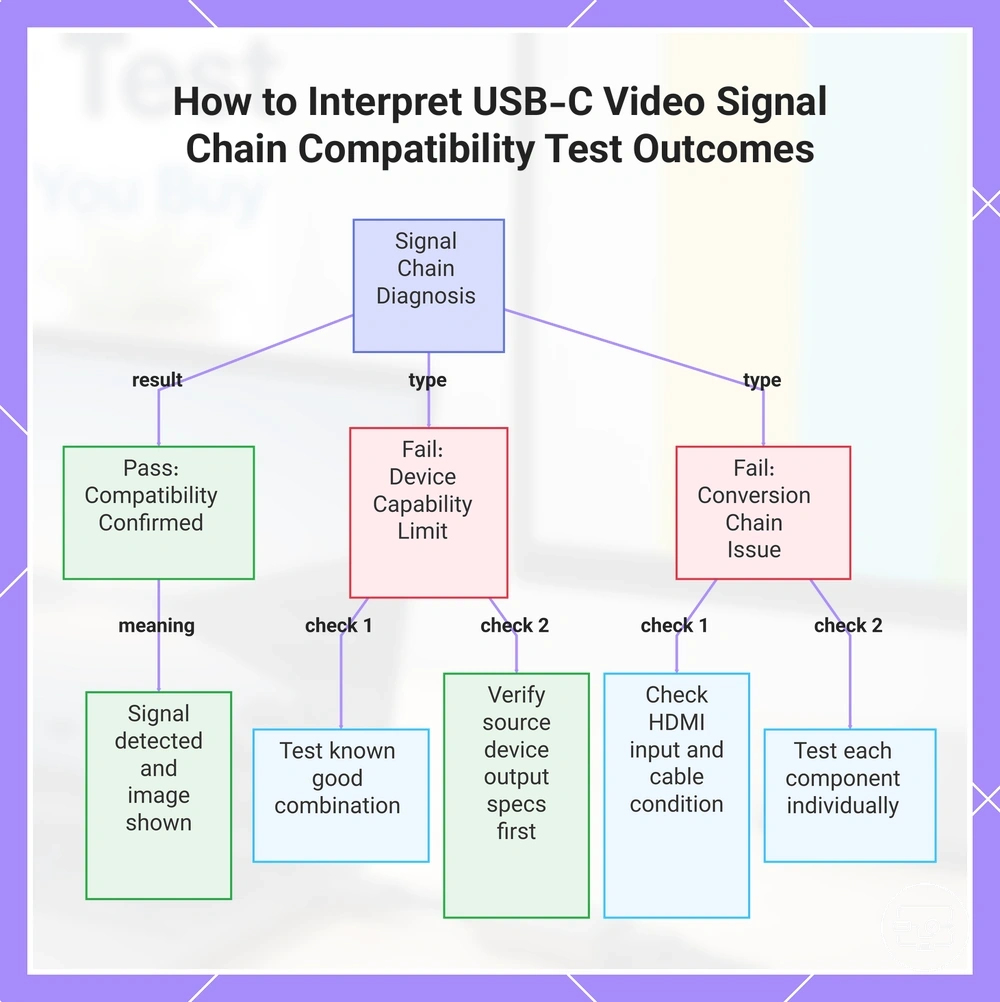
A pass confirms compatibility, while a fail requires isolating whether the limit is device capability or the conversion chain.
Likely cause classes fit into three groups: device capability (the source device output specifications), conversion chain components (adapter type, cable, or dock), and display or input state (the monitor input selection, port condition, or power status).
Interpreting outcomes and choosing the next best path depends on where the signal chain breaks:
- Signal detected and display shows image → pass: compatibility confirmed.
- No signal but adapter works with similar devices → isolate device capability by testing a known good combination.
- Adapter new and untested → check its specifications against the source device output.
- Using a hub or dock → verify power delivery; insufficient power can disrupt signal.
- Display shows 'No Signal' despite powered adapter → check HDMI input selection and cable condition.
- Source device supports video over USB-C but adapter does not → replace adapter with one matching required output.
- Multiple components suspect → test each component individually with a known working partner.
A common confusion is mistaking a device capability limitation for a conversion chain failure; verify the source device output specifications first.
When a fail points to the adapter or cable, compare adapter, cable, and dock options to find the right component for your setup.
Once you understand the failure class, use a buying checklist to avoid incompatibility in future purchases.
This chart helps diagnose whether a compatibility test passed or failed and guides the next troubleshooting steps.
What “No Signal” During the Test Usually Indicates and What to Validate Next
“No Signal” during the test usually means either the display is not receiving a valid HDMI signal (cable or input issue) or the device is not detecting the display (handshake failure).
To validate a “No Signal” message, check these common causes. Each item lists the symptom, possible cause, what to check, and what the result indicates.
- Symptom: No signal immediately after connection. Possible cause: The display input may not be selected correctly. Check: Make sure the monitor’s input source matches the port the cable is plugged into (e.g., HDMI 1 vs. HDMI 2). What it means: If the input is correct but the signal still does not appear, move to the next check.
- Symptom: No signal appears after power state changes (wake from sleep, reboot). Possible cause: The adapter or hub in the chain may lack sufficient power. Check: Confirm any active adapters or docks have external power connected and are not solely bus-powered by USB. What it means: If connecting external power restores the signal, the chain requires a powered intermediate component.
- Symptom: No signal occurs when the cable is moved or touched. Possible cause: The cable may not be fully seated. Check: Re-seat both ends of the HDMI cable until they click firmly into place. What it means: If the signal returns after re-seating, the connection was loose.
- Symptom: No signal on one port but signal on another. Possible cause: The cable or specific port may be faulty. Check: Swap the cable with a known-good cable and test the same port. What it means: If the replacement cable works, the original cable is likely defective; if the same port continues to show no signal, the port itself may be the problem.
- Symptom: No signal when using an adapter (e.g., USB-C to HDMI). Possible cause: The adapter type may not be compatible with the source device’s video output capabilities. Check: Verify if the source device supports video output over the adapter’s interface (e.g., DisplayPort Alt Mode, Thunderbolt). What it means: If the device does not support video over that interface, the adapter cannot produce a signal.
- Symptom: No signal when using a long cable or extension. Possible cause: Signal degradation due to cable length at the required resolution and refresh rate. Check: Test with a shorter, certified HDMI cable at the same resolution and refresh rate. What it means: If the shorter cable works, the original cable likely exceeds the reliable length for that signal bandwidth.
Boundary note: A missing device video-output support can mimic adapter incompatibility. Verify the source device’s video output capabilities before concluding that the adapter is at fault.
When the Result Suggests a Different Solution Type Instead of Another Adapter
When the result suggests a different solution type, the choice depends on the capability constraint causing the adapter issue—like a driver conflict, hidden device, or power mismatch—rather than on the connector shape alone. The following checklist maps these constraints to solution type directions, reducing mismatch risk instead of reaching for another adapter.
- Driver or hidden device conflict: If the adapter shows a yellow triangle in Device Manager, a ghosted driver from a previous installation may be the constraint; uninstalling the hidden device (after enabling Show Hidden Devices) and reinstalling the driver often resolves the issue, making a different troubleshooting direction more effective than replacement.
- Power management disabling: When the adapter intermittently stops responding, a likely constraint is the power-saving setting that turns off the adapter; disabling the 'Allow the computer to turn off this device' option in Device Manager provides a solution type that can avoid the need for a new adapter.
- Power requirement insufficiency: If the adapter fails to power up or is not recognized, the host port may not supply enough wattage; a powered hub or dock often satisfies the power requirement and restores stable operation.
If the result points to a different solution type, addressing the underlying capability constraint reduces mismatch risk more than trying another adapter.