
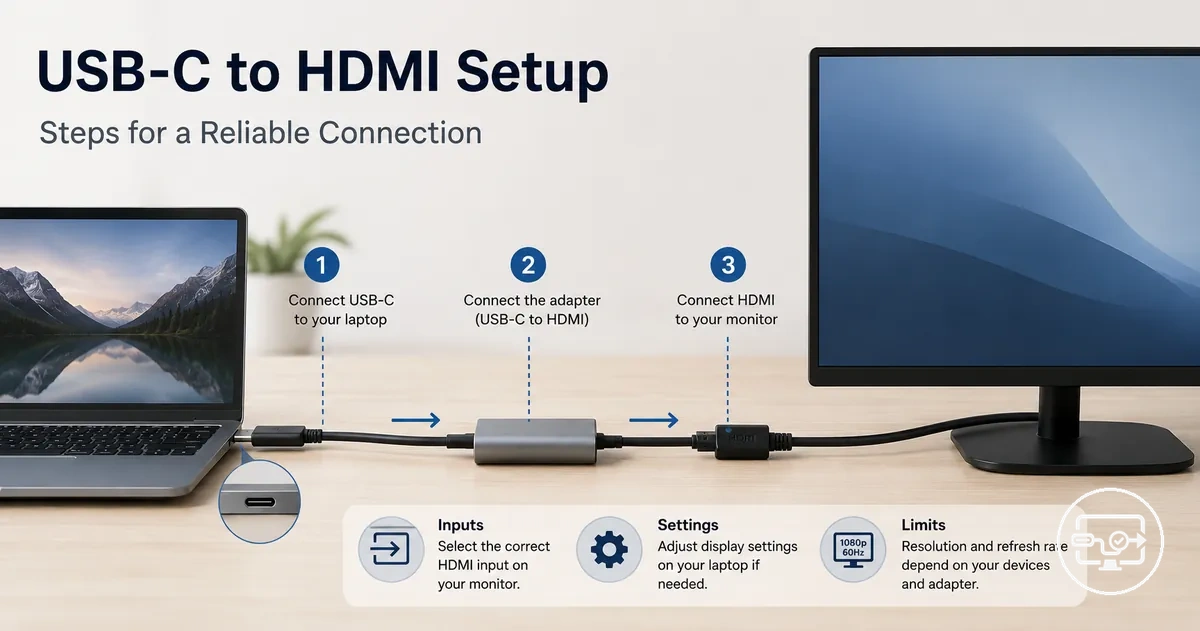
USB-C to HDMI Compatibility Setup for a Reliable Connection
A USB-C to HDMI compatibility setup is a connection path that sends video from a USB-C source to an HDMI display. With compatible hardware and correct cable order, the result is a detected display with stable output and typically no signal loss.
This setup requires a device with a USB-C port that supports video output, a display with an HDMI input, and a compatible adapter, hub, or cable. For capability verification, see the USB-C to HDMI Compatibility hub.
The steps on this page address common connection failures: no signal, display not detected, or wrong display mode—for instance, duplicate instead of extend or mirror.
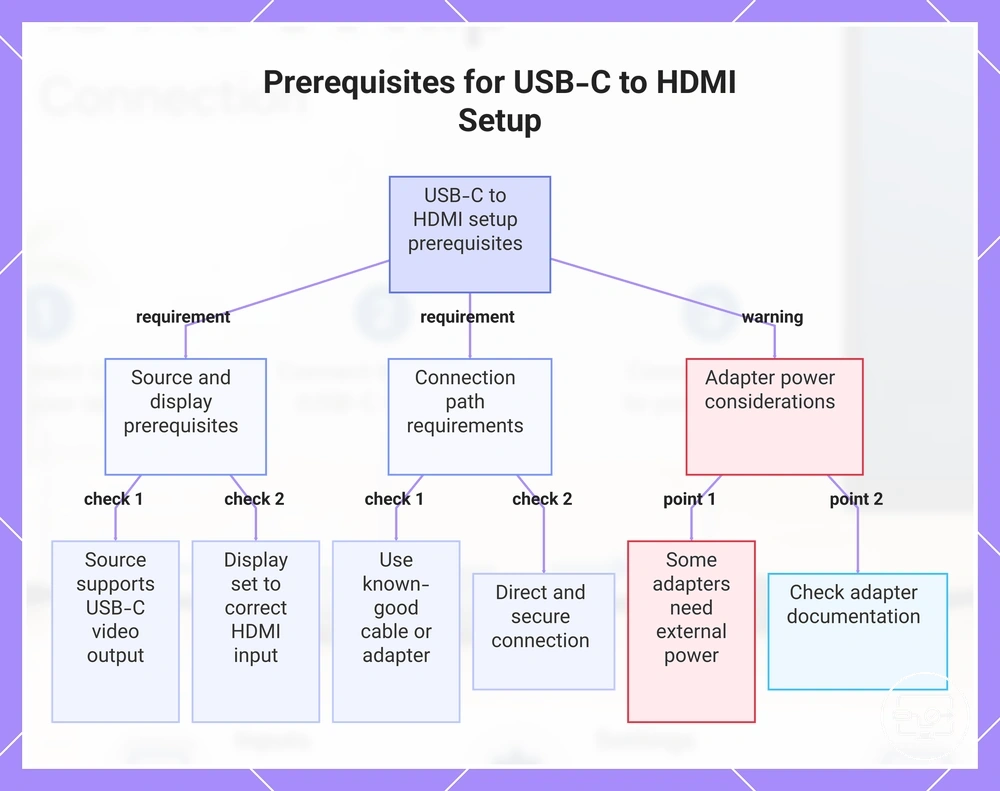
Prerequisites that must be true for USB-C to HDMI setup to work
USB-C to HDMI setup requires these prerequisites: the source must support USB-C video output, the display must be on a working HDMI input, and the connection path must use a known-good cable or adapter. Output capability alone does not guarantee a working setup without the correct HDMI input and a reliable path.
Confirm each prerequisite and resolve any issue before proceeding.
- The source device supports USB-C video output.
- The display is set to the correct HDMI input source.
- A known-good cable or adapter is used.
- The connection path is as direct as possible.
- A hub or dock used in the setup may need to be powered appropriately.
- The HDMI cable is securely connected at both ends.
Some adapters draw power from the source device, while others require an external power source for stable operation. The adapter's documentation can confirm whether external power is needed, especially when driving higher resolutions or multiple displays.
This chart shows the essential prerequisites and warnings for a working USB-C to HDMI connection.
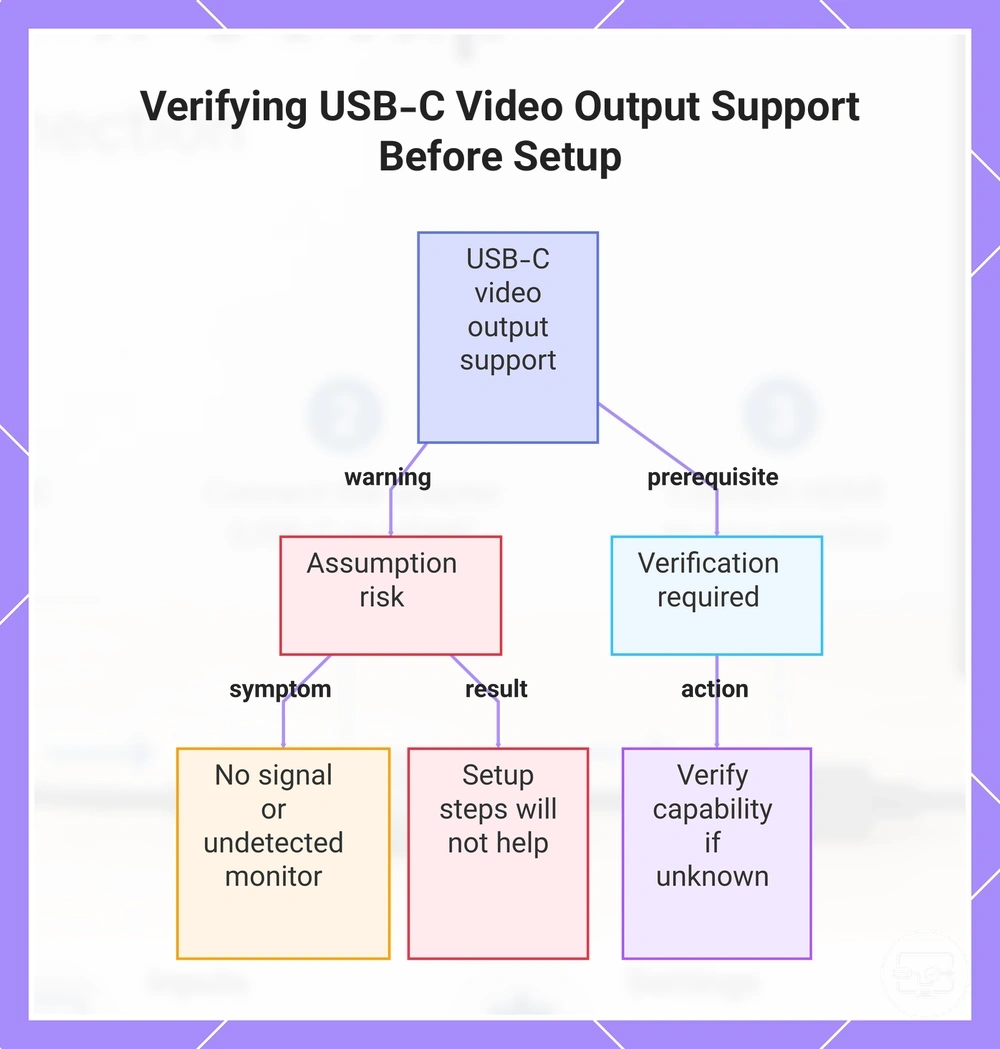
Video output support is assumed here and should be verified separately if unknown
This page assumes USB-C video output support, but it is not guaranteed. Verify first if its capability is unknown.
A monitor may show no signal or remain undetected when USB-C video output is unsupported. In that case, the setup steps here will not help unless USB-C video output is confirmed.
This chart highlights the importance of verifying USB-C video output support to avoid monitor detection failures and wasted setup effort.
Connection roles and direction: source USB-C output to HDMI display input
The signal flows from the source device's USB-C output to the display's HDMI input through four components:
- Source device: The device (laptop, tablet, or phone) sends the video signal through its USB-C output.
- USB-C-to-HDMI solution: An adapter, hub, or dock converts the USB-C output into an HDMI-compatible signal.
- HDMI cable segment: The cable carries the converted signal from the solution to the display's HDMI input.
- Display input: The HDMI port on the TV or monitor receives the signal for display.
Prepare the cable path, HDMI input, and power conditions before connecting
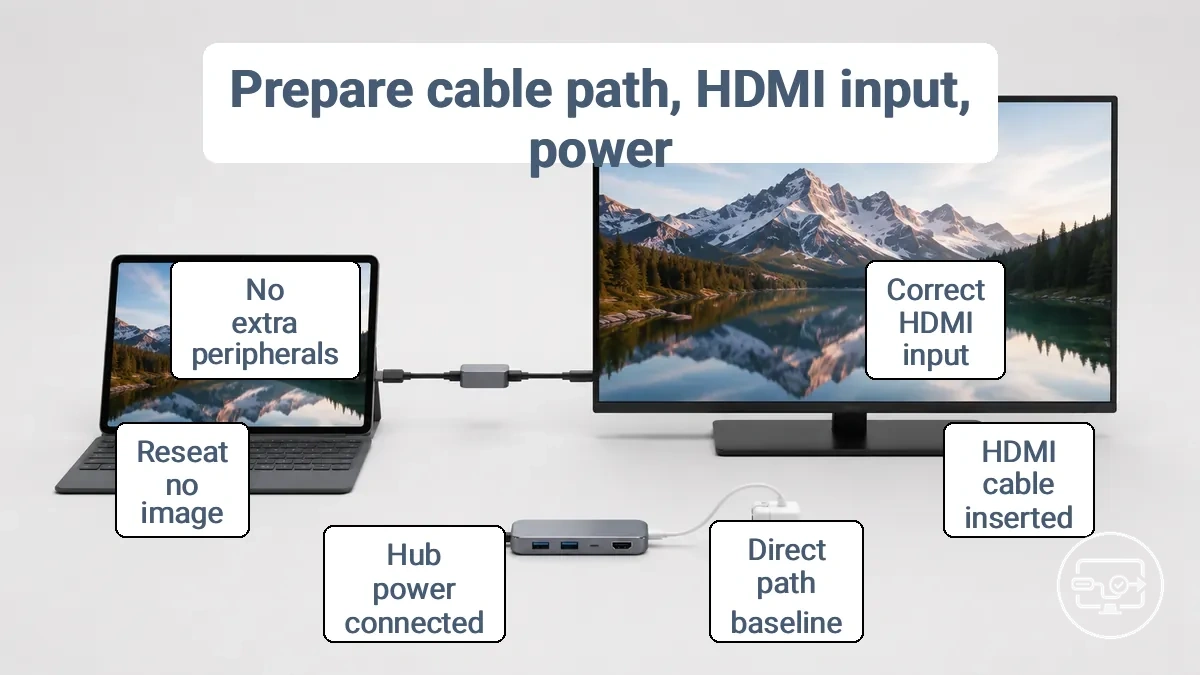
A stable starting state reduces the chance of first-try failures. Before plugging in a USB-C to HDMI adapter or hub, check the display input and cable arrangement to make the connection sequence more predictable.
Use this checklist to verify the setup conditions and start from a simplified chain.
- Select the correct HDMI input on the display; most televisions and monitors label each port and require manual source selection.
- Use a known-good HDMI cable segment that is fully inserted at both ends; a loose connection often causes no-signal errors.
- Establish a direct path baseline by connecting the USB-C source to the display through a passive adapter or short cable before adding a hub or dock.
- When a hub or dock is part of the chain, connect its external power delivery if one is available; many multi-port hubs require stable power to maintain video output.
- Be ready to unplug and re‑plug the connection if no image appears; a simple reseat can often re‑establish the HDMI handshake without changing any settings.
- Avoid connecting extra peripherals (USB drives, card readers, Ethernet) during the first test; they add variables that can mask a basic signal issue.
This diagram shows the prepared cable path, correct HDMI input selection, and optional hub power connection.
Select the correct HDMI input and reset the display to a known state
You can only judge connection success after selecting the correct HDMI input. The steps below standardize input selection and reset the display.
Select the HDMI input matching the cable's port. If display input settings are unclear, refer to TV and projector input settings for guidance.
- Turn on the display and the connected device.
- Press the Input or Source button on the remote to open the input menu.
- If no signal appears, reset the display: unplug it briefly, then plug it back in.
When hubs and docks need external power delivery for stable HDMI output
Some hubs and docks require external power delivery to maintain stable HDMI output.
- A hub or dock operating solely on bus power from the laptop may cause intermittent dropouts in HDMI output, especially when multiple peripherals are connected.
- Connecting external power to the hub or dock's power delivery port, while keeping the same display and cable setup, may improve HDMI stability, suggesting insufficient power from the laptop as the likely cause.
Connection sequence that reduces no-signal and not-detected outcomes
Connection order can affect whether a USB-C source is detected and a handshake succeeds. Attempt the full sequence once before changing any variable.
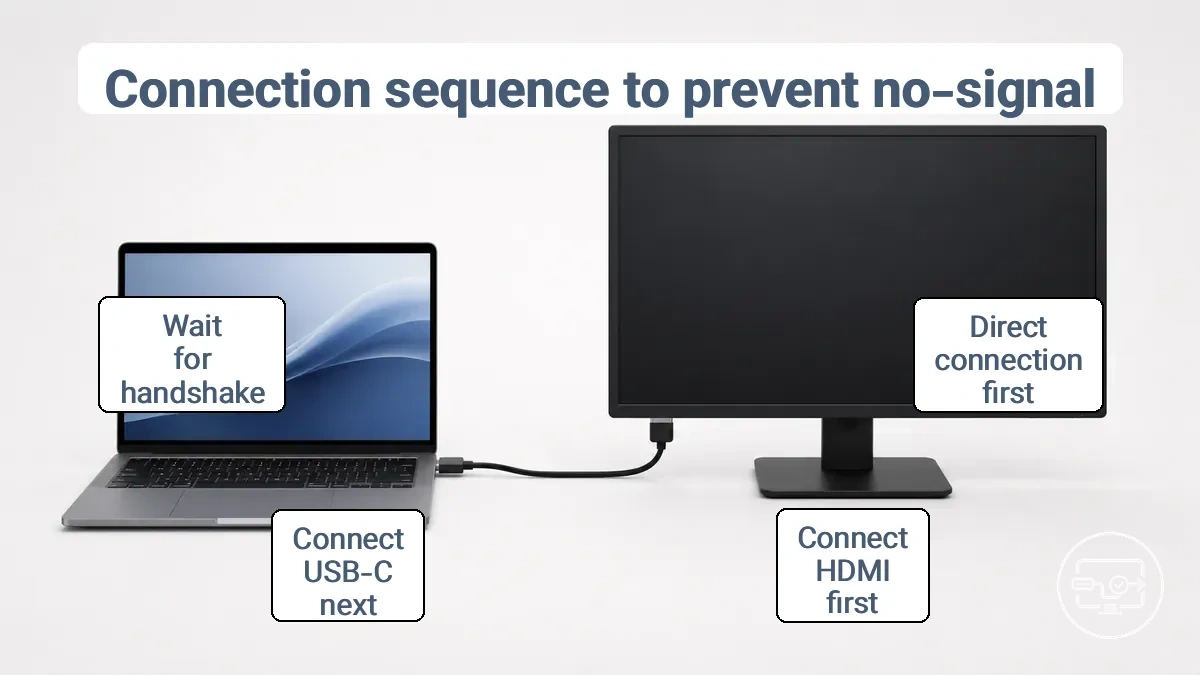
Start with a baseline direct connection before involving hubs or docks. This connection order reduces 'no signal' and 'not detected' outcomes.
- Connect the HDMI cable to the display input first. The display input becomes ready to receive a signal.
- Connect the USB-C end of the cable or adapter to the source device. The display often detects the source and starts the handshake.
- Wait several seconds for the handshake to complete. The display typically shows the input source name or a 'searching' indicator.
- If using a hub or dock, plug the hub power adapter before connecting the USB-C cable. The powered hub can detect the display and maintain a stable connection.
- Confirm that the correct input source is selected on the display. The display should show the source image without a 'no signal' message.
- If the display remains blank, re-seat the HDMI connection at the display end and retry. Re-seating often clears the no signal state.
Direct adapter or cable connection sequence as the baseline setup
A direct connection between the adapter or cable and the display is the baseline for reducing variables before adding other equipment.
- Set the display to the correct HDMI input and confirm it is ready to receive a signal.
- Connect the HDMI end of the adapter or cable to the display's HDMI input.
- Connect the USB-C end of the adapter or cable to the source device.
- Wait for the display to detect the source signal.
- Confirm the display shows the expected output.
Hub or Dock Connection Sequence with Charging and Peripherals
Hubs and docks that combine charging and peripherals introduce a power variable that can prevent first‑time detection if devices are attached in the wrong order. A stable setup begins with power delivery and the display output before connecting any USB devices. Set up for stability first, then add peripherals.
- Connect the hub or dock to its power adapter and plug the adapter into a wall outlet. This powers the dock before any device is connected.
- Connect the hub or dock to the laptop using the provided USB‑C or Thunderbolt cable. The laptop should detect the dock and begin charging if the port supports power delivery.
- Attach the external monitor to the hub or dock via HDMI or DisplayPort. Confirm that the monitor shows the laptop’s desktop before moving on.
- Add low‑draw peripherals such as a wired keyboard and mouse. Check that each device is recognised by the operating system and responds correctly.
- Connect higher‑draw USB devices such as external drives or a phone charger only after the previous steps are stable. If any component is not detected, disconnect all peripherals and retest one device at a time, starting with the monitor.
Phone or tablet to TV connection sequence and common constraints during setup
Phone or tablet to TV setup often fails due to device constraints, even when the physical connection path is correct. The basic connection order includes these steps, followed by constraint checks to verify before attempting.
- Check for a video output port on the phone or tablet (USB-C, micro USB, or dedicated HDMI).
- Use a cable or adapter that matches the port and is designed for video output (e.g., USB‑C to HDMI, MHL adapter, SlimPort adapter).
- Connect one end of the cable to the device and the other end to an available HDMI port on the TV.
- Switch the TV to the correct HDMI input source using the remote or on-screen menu.
- If the display does not appear automatically, look for screen mirroring or display output options in the device settings.
Common phone and tablet setup constraints that often prevent a successful connection include:
- Device supports display output: Not every phone or tablet can send video over its USB or HDMI port. Check the manufacturer specifications or use a compatibility checker app to confirm before relying on a wired connection.
- Cable or adapter compatibility: An adapter that works with one device may not function with another, even when the physical connector fits. Confirm that the adapter is actively converting the signal when required.
- TV input and resolution handling: The TV needs to support the resolution and refresh rate sent by the device. Older TVs may not detect the signal if the device outputs a format the TV cannot handle.
- Device output mode support: Some phones or tablets require enabling display output in device settings or may only output video when connected to a USB-C adapter that supports Alt Mode. Without this setting enabled, the TV may not detect the signal.
- Signal and power requirements: Some adapters need external power to convert the video signal, and the device may not output if the cable or adapter does not support the required specification. Ensure the adapter is powered if indicated.
Enable and configure external display output on the source device
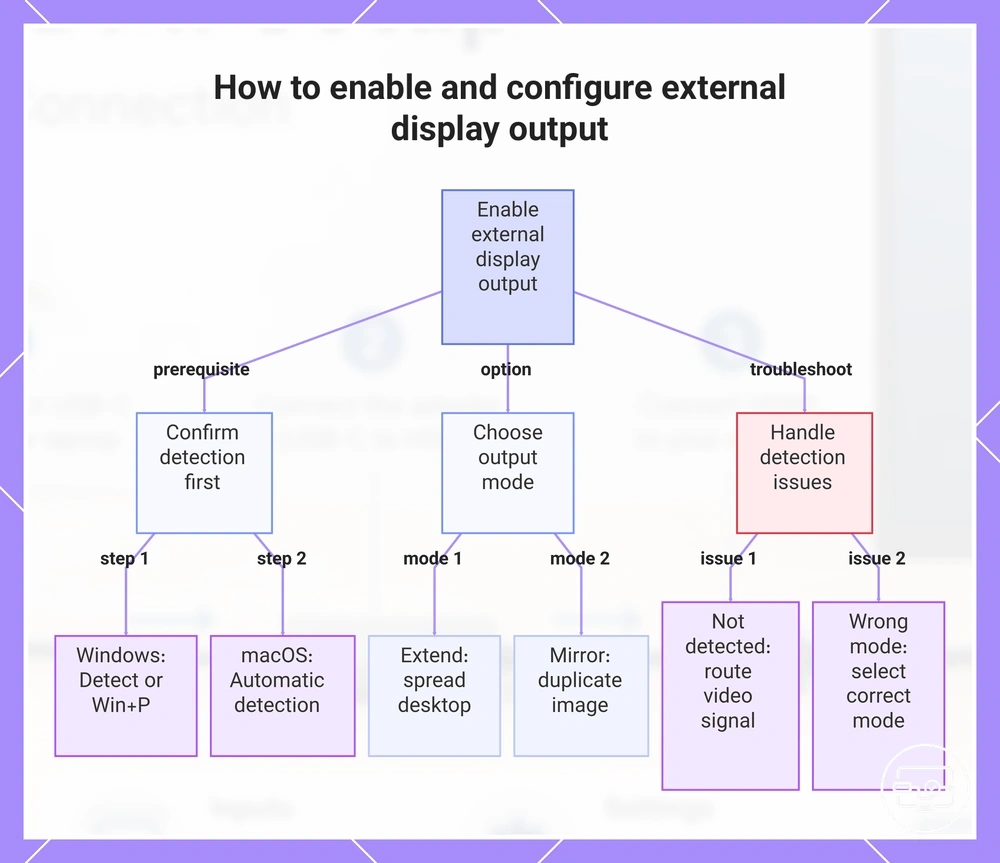
Enabling external display output on the source device requires the system to correctly route video to the connected monitor, which depends on the display settings detecting the external display first. Confirm detection before adjusting output mode.
Output routing is how the source device sends video signal to the external display instead of the built-in screen.
In the source device's display settings, output routing typically offers two modes: extend (spreads the desktop across screens) or mirror (duplicates the same image). After routing is active, choose extend or mirror based on how you intend to use the additional monitor.
If the external display is not detected, first route the video signal; if detected but shows the wrong mode (mirror instead of extended, or vice versa), select the correct mode in display settings. Steps to detect and route output vary by operating system, but the core workflow remains similar:
- Windows: Open Display Settings from the Start menu or by right-clicking the desktop. If the external display does not appear, look for the Detect option under Multiple displays. You can also press Windows logo key + P to switch between modes such as Extend and Duplicate.
- macOS: Open System Settings > Displays. A connected external display is typically detected automatically. Use the display arrangement settings to switch between mirroring and extended desktop, and adjust resolution as needed.
This chart outlines the key prerequisite detection, output mode options, and basic troubleshooting steps for setting up an external display.
Windows and laptop display settings that control detection and output routing
Use Windows display settings to configure detection, display mode, resolution, and refresh rate.
- Right-click the desktop, select Display Settings, and the panel shows a diagram of all connected monitors at the top.
- If the second monitor is missing, click the Detect button near the Multiple displays section to force Windows to re-detect the display.
- Open the Multiple displays dropdown and choose Extend these displays to use both screens independently, or Duplicate to mirror the same content on all screens.
- Select the external monitor in the diagram and verify the resolution under Scale and layout; set it to the monitor's native resolution.
- Under Advanced display settings, confirm the refresh rate for each monitor and select the highest supported rate.
- Click Keep changes if prompted, then drag a window across screens to confirm the extend or duplicate mode works.
macOS display settings that affect mirroring, arrangement, and resolution
Verify each of the following macOS display settings that affect mirroring, arrangement, and resolution.
- Open the Displays settings in macOS to see if the external monitor appears in the list.
- If the display is being duplicated, disable mirroring so the desktop can extend across both screens.
- In the arrangement area, drag the display icons to match the physical positions of your screens.
- Select the external display and choose its native resolution or a scaled option that looks sharp.
- When available, set the refresh rate to the highest stable value the monitor supports for smoother motion.
Android display output modes that change the on-screen experience
Android external display output modes change the on-screen experience, but their availability and the resulting display depend on device support and the active output mode. When connected to a TV or display, the following mode types may be available:
- Mirror mode: The TV typically mirrors the device screen, and both displays may stay synchronized.
- Desktop-like mode: The TV may show a separate interface optimized for larger screens, with resizable windows and a taskbar, while the device screen may remain independent.
- Extend-like mode: The TV may display an extended workspace where different apps can be opened separately, while the device screen may remain independent.
Choose the correct display mode and performance settings after handshake
Choosing the correct display mode and performance settings involves two decisions: whether to extend or mirror the display, and then setting resolution and refresh rate for stable output. Making the wrong choice in either area can result in blank screens, flicker, or missing audio after a successful handshake.
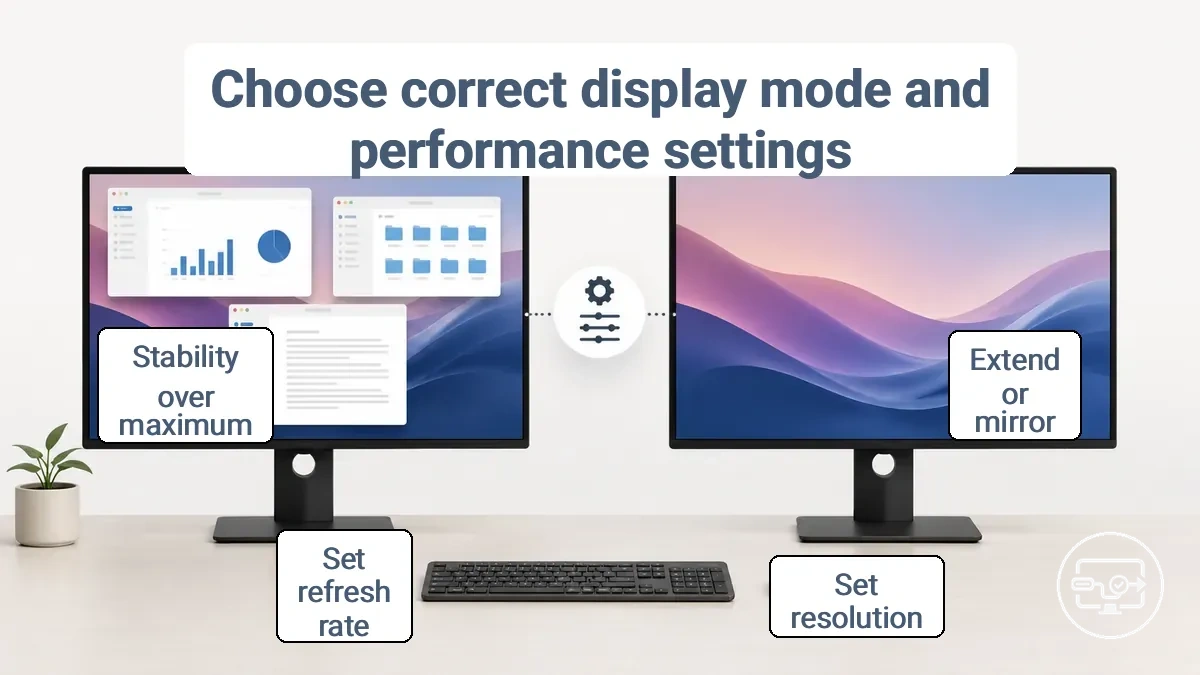
Setting resolution or refresh rate too high for the display and cable combination often causes instability. Limits vary by device and display, so adjusting gradually from a known stable baseline is the safe approach.
These bullets separate the mode choice from the performance adjustments to help you avoid blank screens, flicker, or missing audio.
- Extend versus mirror: Extend treats the second display as additional workspace; mirror duplicates the same content. Choose extend for multitasking, mirror for presentations or when both screens must show identical output.
- Detected but wrong mode: If the display is detected but shows a blank screen or no desktop, the display mode may be set to an unsupported configuration. Switch between extend and mirror to test.
- Resolution and refresh rate: After choosing the mode, set the resolution and refresh rate to values the display and cable can reliably handle.
- Stability over maximum: A lower resolution or refresh rate that stays stable is more usable than a flickering high setting. Do not assume the maximum value will work reliably.
- Flicker and dropouts: If flicker or audio dropouts occur after the mode is correct, reduce the refresh rate or resolution. These symptoms often indicate the data rate is too high for the connection.
Extend vs mirror selection based on the task and the display layout
Extend treats the second display as a separate workspace for different content, while mirror duplicates your main screen on both displays. Choose based on your task and layout.
- Presenting slides to an audience: Mirror is often better so everyone sees the same content and you avoid showing other windows.
- Working with multiple documents or apps: Extend suits tasks that need more screen space, such as comparing files side by side.
- Video conferencing while sharing your screen: Extend lets you keep participants on one display and your presentation or shared content on the other.
- Editing video or design projects: Extend gives you room for toolbars and timelines on one screen and a full preview on the other.
- Reading and taking notes: Extend lets you keep reference material open on one screen while typing notes on the other.
Resolution and refresh rate alignment to prevent flicker, dropouts, and blank screens
Stability at your desired resolution and refresh rate depends on whether the entire signal path can sustain that combination. When flicker, dropouts, or blank screens occur at higher settings, the settings likely exceed what the GPU, cable, adapter, and display can reliably deliver. A step-down test reduces one variable at a time until stability returns; the steps that follow guide you through this test.
- Lower the refresh rate step by step (for example, reduce it by one increment at a time) and retest stability after each change.
- Turn off HDR if it is enabled, then retest at your target refresh rate.
- Disable any variable refresh rate (VRR) feature, such as FreeSync or G-Sync, and retest.
- Reduce color depth if your display supports it (for example, from a higher bit depth to a lower one), then retest in scenarios that previously caused flicker (e.g., loading screens, alt‑tabbing).
- Remove any dock, hub, or adapter from the connection path and connect the display directly to the source.
- Test the same monitor on a different source device, or test another monitor on the same source.
When higher resolutions or 4K content with HDR are involved, stability expectations may need adjustment. See our guide on 4K and HDR expectations for more context.
HDMI audio output selection when video works but sound does not
The cause is often an output-selection issue rather than a cable failure when HDMI video works but audio does not. The HDMI audio output device may not be set as default, or the volume or mute settings on the source or the TV or monitor speakers may be incorrect. Use this checklist to select the correct audio device and verify settings.
- Right-click the speaker icon in the system tray and choose Playback devices or Open Sound settings.
- Under the Playback tab, enable Show Disabled devices to see all outputs.
- Locate the HDMI audio output device (often labelled HDMI, Digital Audio, or the display name) and select it.
- Right-click that HDMI output device and choose Set as Default Device.
- Open the properties of the HDMI output device and verify the volume is not muted or too low.
- Check that the TV or monitor speakers are not muted and the display volume is turned up.
Verification checks for a stable and repeatable USB-C to HDMI connection
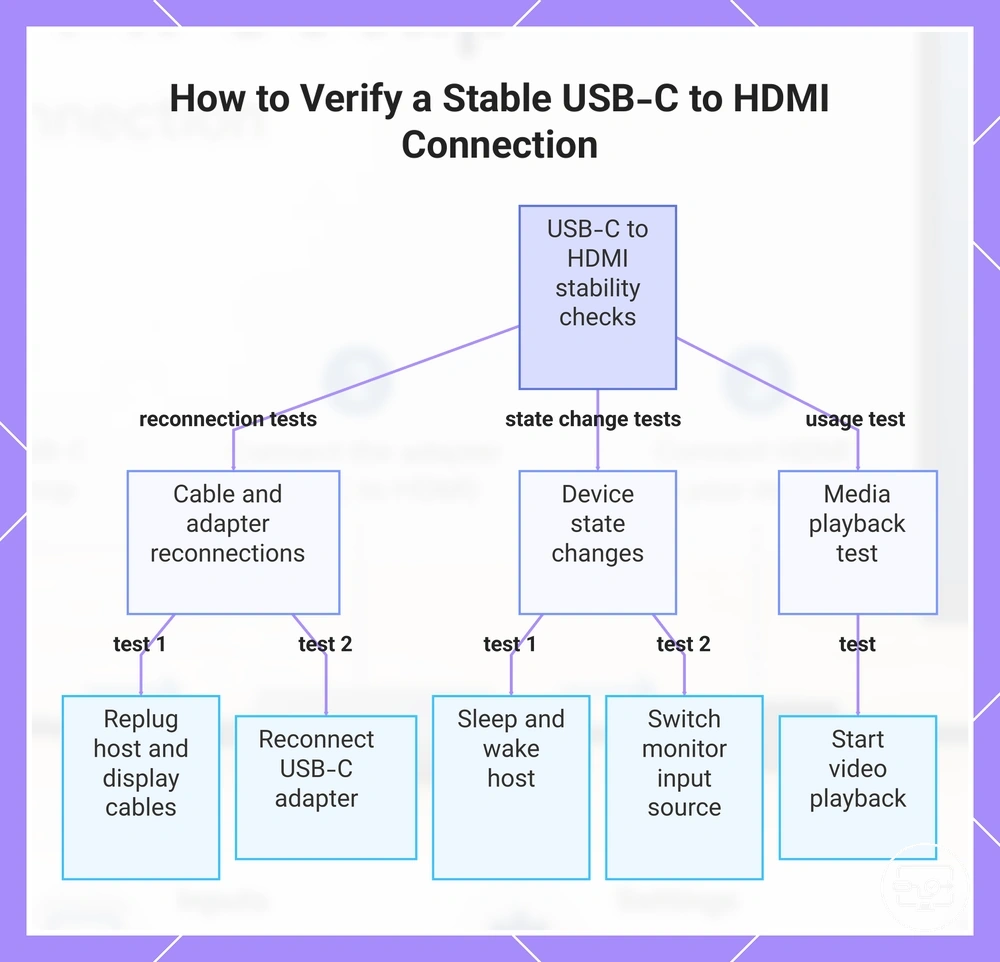
A stable and repeatable USB-C to HDMI connection means the display is consistently detected and maintains output without interruption after common events such as replugging the cable, waking from sleep, switching inputs, or starting playback. This checklist provides observational tests to verify stability.
- Replug the USB-C cable at the host end: the external monitor is detected within seconds, and the desktop image appears automatically.
- Reconnect the HDMI cable at the display end: the signal typically returns, and resolution and flicker stay consistent.
- Put the host device to sleep and then wake it: the monitor typically reconnects, and output remains unchanged after sleep.
- Switch the monitor input source away from the HDMI port and back: the host re-detects the display, and the image is restored.
- Start video playback on the host: playback typically runs smoothly with no noticeable stuttering, artifacts, or black screens.
- Disconnect and reconnect the USB-C to HDMI adapter while the host remains on: the system typically recognizes the adapter again without needing a reboot.
This chart shows the main verification checks to confirm a stable and repeatable USB-C to HDMI connection after common events like replugging, sleep, input switching, or playback.
Confirm the display stays detected across replug, sleep, and wake cycles
Test that the display stays detected across replug, sleep, and wake cycles by running these repeatability tests.
- Replug the display cable while the system is running. Pass if detected within seconds; fail otherwise.
- Put the system to sleep, then wake it after 30 seconds. Pass if detected on wake; fail otherwise.
- Repeat the sleep/wake cycle three times consecutively. Pass if detected after each cycle; fail otherwise.
- Unplug the display cable while the system is asleep, wait 10 seconds, replug, then wake. Pass if detected on wake; fail otherwise.
Identify early instability signals before escalating troubleshooting
Catching early instability signals prevents random changes that might mask the real issue. Grouping observed issues by symptom class helps narrow candidate causes without jumping to a fix.
- Detection issues such as a display not being recognized suggest checking adapter seating and system detection settings.
- Video stability problems like intermittent flicker or dropouts may point to bandwidth limits or cable integrity as candidates.
- Audio symptoms including missing or garbled sound can indicate EDID negotiation or channel configuration missteps.
- Performance degradation such as reduced resolution or stutter often signals encoder load or handshake timing issues to check first.
Fast fixes when setup fails before deeper troubleshooting
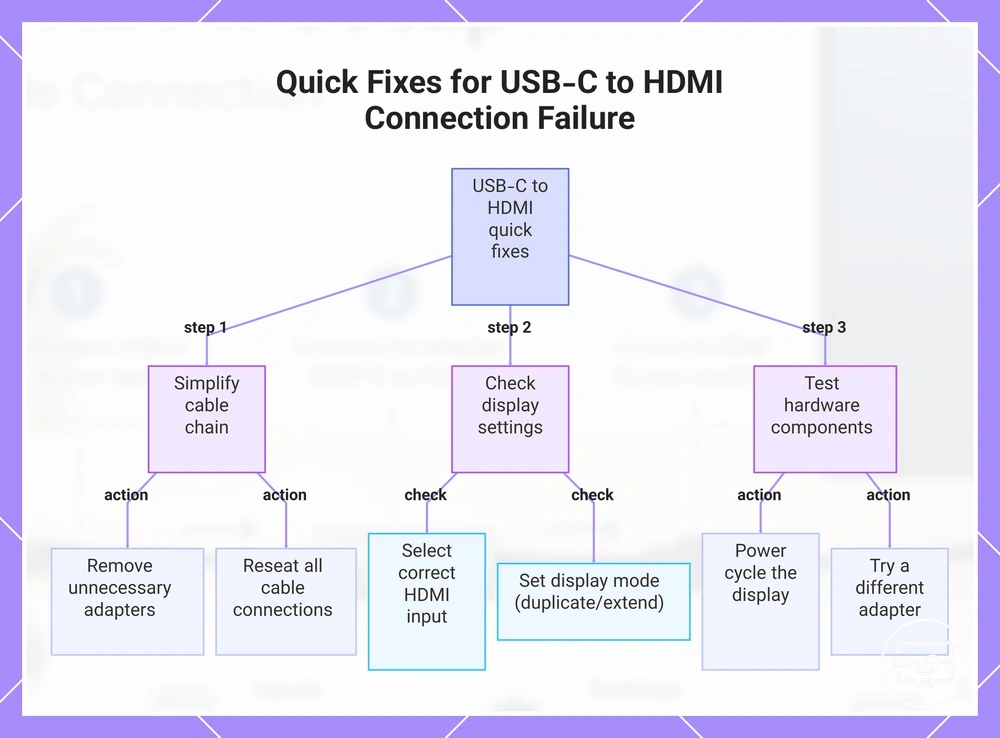
When a USB-C to HDMI connection fails, the cause is often a loose connection, wrong input setting, or too many adapters in the chain. Start by simplifying the chain, reseating all cables, and checking the display input or source mode. Change only one variable between retests to avoid confusion. For example, a 'no signal' screen usually points to a display input issue, while a 'not detected' message suggests the source device is not sending a signal. These quick fixes focus on low-risk, reversible actions to get the connection working again without deeper troubleshooting.
- Simplify the chain by removing unnecessary adapters or extension cables and connecting the USB-C source directly to the HDMI cable or adapter. Retest once.
- Reseat all cable connections by unplugging and replugging both the USB-C end and the HDMI end. Retest once.
- Check the HDMI input on the display by cycling through available inputs or confirming the correct input is selected. Retest once.
- Verify the display mode on the source device. For a laptop, try switching between duplicate and extend modes using the function key or display settings. Retest once.
- Power cycle the display by turning it off for 10 seconds and turning it back on. Retest once.
- Try a different USB-C port on the source, if available. Some ports may not support video output. Retest once.
- If using a USB-C to HDMI adapter, try a different adapter to rule out a faulty unit. Retest once.
If these quick fixes do not resolve the issue, the next step is to if setup fails, troubleshoot by symptom and identify the specific cause.
This chart shows the first quick, low-risk actions to resolve USB-C to HDMI connection failure before moving to deeper troubleshooting.
Simplify the Chain and Swap Components to Isolate the Failure Point
Isolate the failure point by simplifying the chain: swap one component at a time and retest.
- Swap the cable and retest with a different USB-C to HDMI cable.
- Swap the display input by connecting to a different HDMI port or display.
- Swap the adapter or hub by connecting the source directly to the display.
- Swap the source device by using a different USB-C device that supports video output.
- Retest the baseline connection after each swap.
No signal vs not detected setup failures and what to check first
When a USB‑C to HDMI setup fails, two distinct error messages point to different failure stages. “No signal” means the display receives no video data, while “not detected” means the source does not recognize the display. The split checklist below organizes the first checks by failure stage.
- No signal: verify the HDMI input on the display matches the cable’s port.
- Check the cable path for loose or damaged connections at both ends.
- Confirm the USB‑C port supports video output (some ports are charge‑only).
- Try a different HDMI port on the display, if available.
- Not detected: open display settings and click “detect” to scan for displays.
- Change the connection order: connect HDMI to display first, then attach USB‑C to source.
- Update or reinstall display and USB‑C drivers.
- Test without any adapter or extender, if currently used.